Nirmal - Star Trails
Star Trails Photography from light polluted areas
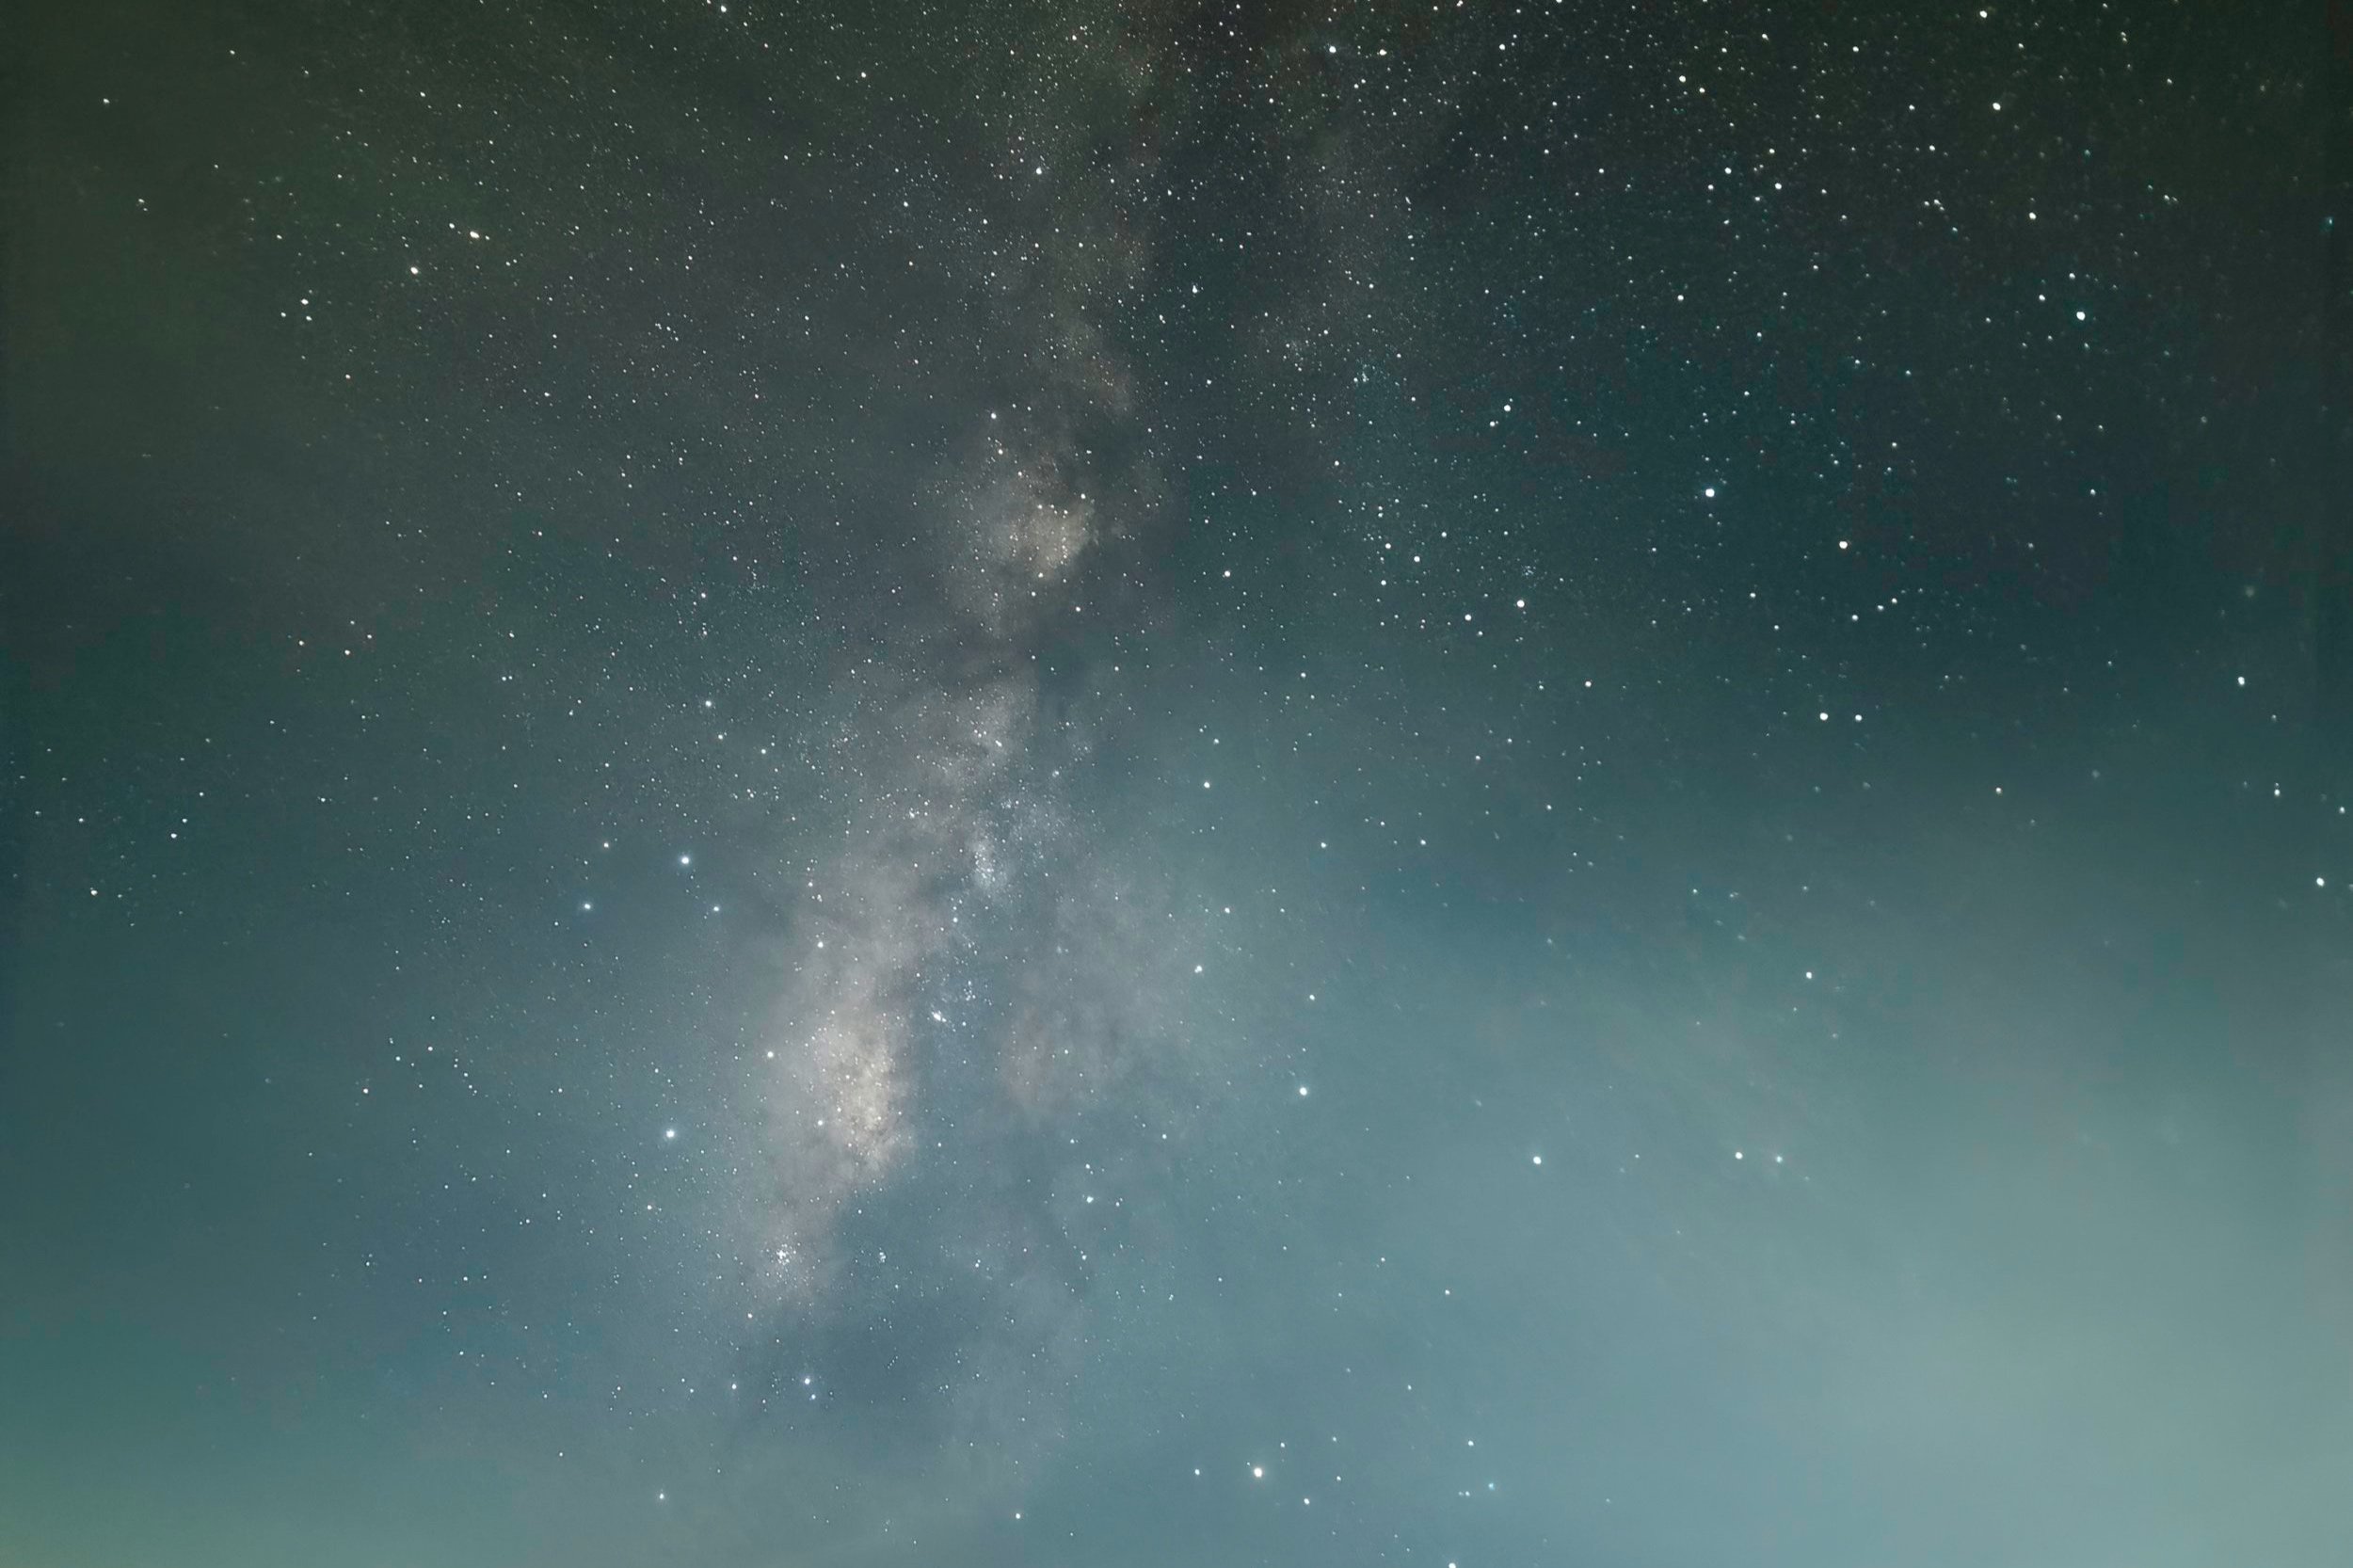
Nirmal, Telangana, India
Star Trails are the result of taking very long exposures of the stars in the night sky. Because of the Earth’s rotation, from our perspective, the stars appear to be moving across the sky, offering us the possibility of capturing streaks of light. Here, the longer the exposure, the longer the trails. The length and shape of the trails will depend on the length of the exposure and the direction of the camera.
I had the opportunity to explore a few dark sky sites in Telangana, in collaboration with HyTiCos, which could be utilised for star gazing, star trails photography & astrophotography in general. The first location we were at - and this is also where I did my earlier Milky Way Timelapse - is near the town of Nirmal - a Bortle 4 sky with some degree of light pollution. This was a reconnaissance trip to gauge the potential of the site. This location has spectacular naked eye visibility of some of the major constellations and star clusters and can be a prime location for Star Trails Photography as the view is clear in all directions - East, West, North & South.
As with the earlier timelapse of the rising Milky Way (Blog, Video), this Star Trails Timelapse too contains multiple meteors. Keep a sharp eye on the sky and you will see them streak - a few more than before - some small and some big. The longer and more consistent streaks are planes - easily identified by the red and green navigation lights on the left wingtip (port) and right wingtip (starboard) respectively. The long white streaks without the red and green are the satellites or sometimes space debris like abandoned boosters - this was something I had not expected to see and was quite surprised to discover while at one of the locations.
Exif: Canon 1Dx Mark ii | Samyang (Rokinon) 14mm f/2.8 IF ED UMC | f/2.8 | 19 seconds | ISO 3200 | Manually focused with a Bahtinov Mask & WB set to Manual at 4600k.
Timelapse Start: 19:14:17 | Timelapse End: 06:47:14 | Total Duration of shoot: ~ 11 hours 33 minutes | Star Trails created using StarStaX
This is showing just one of the multiple meteors captured all of which can be seen on the star trails timelapse below.
Light Pollution Map of South India
Light Pollution Map of Hyderabad, India
The colours in the light pollution maps above are explained via the Bortle Scale chart below. The location I photographed the Star Trails and the earlier Milky Way Timelapse is a Bortle 4.
The Bortle dark-sky scale (usually referred to as simply the Bortle scale) is a nine-level numeric scale that measures the night sky's brightness of a particular location. It quantifies the astronomical observability of celestial objects and the interference caused by light pollution.
I have already talked about the impact Light Pollution has on my previous blog. This Star Trails timelapse provides a much better perspective on how these modern day LEDs and the high powered headlights of cars and other vehicles affect us and the Night Sky in general. Note the powerful car headlights which sweep across the horizon from atleast a kilometer or two away and also pay closer attention at around 55 seconds into the video when a bike drives across the frame from the left to the right lighting up all the electric poles. And shortly after the headlights of a car from behind me which lit up the entire foreground for a few seconds. Towards dawn there was a local fisherman on a motorcycle who drove from the left to the right a few meters behind me - that headlight lit up the foreground too. So it is rather easy to light up a space which ideally should be dark.
Light pollution is impacting wildlife, especially the predators of the night, it is impacting humans and their sleep patterns & hormonal patterns. We have a responsibility to protect our wildlife and protect our own health and cutting down on light pollution is not just good for wildlife and humans but it makes good economic sense too as we owe a lot to our night skies. Everything you see and hear here - excluding the background music - is recorded on site.
I have also included all the exif information with each section.
For the Timelapse I used my Canon 1Dx Mark ii paired with the Samyang 14 mm f/2.8 IF ED UMC. The camera was perched on my ProMediaGear sticks and this time I have not used any Night or Light Pollution filters.
Exif: Canon 1Dx Mark ii | Samyang (Rokinon) 14mm f/2.8 IF ED UMC | f/2.8 | 19 seconds | ISO 3200 | Manually focused with a Bahtinov Mask & WB set to Manual at 4600k.
Timelapse Start: 19:14:17 | Timelapse End: 06:47:14 | Total Duration of shoot: ~ 11 hours 33 minutes
Audio Recording Equipment: Zoom H1N | Roland CS-10EM Binaural Microphones & Earphones | SwitchPod Handheld Mini Tripod. All the audio you hear within the timelapse - with the exception of the background music - is recorded at the site as the timelapse was being shot.
Find everything I have used in my Kit Bag.
Photographing & Creating a Star Trails Timelapse
A clear sky is one of the most important things to watch for when planning a Star Trails photo. In order to get a spectacular Star Trails image, you should try on a completely clear sky for the duration of the shoot. I would highly recommend using Clear Outside charts to help pick a good night. These charts can be a bit difficult to understand at first glance but basically, the more rows of dark blue squares, the better. Once the weather is sorted, I typically switch over to PhotoPills to start planning and work out what I can include in my frame with some help from Google Maps - and the PhotoPills Academy has some amazing tutorials for beginners and advanced shooters along with a ton of very useful tools. Another awesome app is THE PHOTOGRAPHER'S EPHEMERIS which also provides numerous resources and tools to help plan the shoot. Both PhotoPills and TPE are excellent.
The best thing about photographing star trails is that you do not need a dark sky to get a beautiful image. Even in light polluted areas such as this, great star trails can still be captured. Star Trails images are also possible during a full moon.
Timelapses can be created using almost any camera and off late most recent DSLR/mirrorless cameras have a "time-lapse mode" which allows one to create a time-lapse very easily without any editing. Once activated, one just has to point the camera to the the Milky Way, focus, and launch! Me - I prefer the old fashioned way because it gives me more control and especially over the flicker.
Capturing star trails or timelapses for that matter doesn't require expensive gear. All you need is a camera with an intervalometer and a wide angle lens. Any wide angle lens will do, even ones that have bad coma. Since all exposures will be blended, the star distortion is not an issue. Personally, I would recommend using a Full-Frame camera with a 14mm lens. This allows a large portion of the sky with a foreground to be captured. Alternatively, the camera can be set to capture 90% sky for the star trails photos and for the foreground, take 1 photo at the beginning or end of the shoot and these two exposures can be blended in programs like Photoshop. I personally avoid all the software gimmickry and shoot what I want and how I want in camera and at the location unless I am tracking the Milky Way.
If your camera does not have a built in intervalometer, you will need to purchase a remote that has this capability. I use a few triggers which you can find in my Kit Bag - Accessories.
Of course, you'll also need a sturdy tripod and ballhead to make sure the camera does not move over the hours. I have listed what I typically use below:
A wide angle lens which will give a nice wide field of view of the Milky Way.
An intervalometer which will help to control the intervals and exposure times. Some modern cameras have built-in intervalometers but I think an external one still provides more flexibility.
A sturdy tripod which is self explanatory as you need a stable base and avoid any shake caused by wind or uneven ground.
A Ball Head to get to the angle required.
Finally a star tracker which will allow to create a Timelapse that follows the Milky Way and will show the rotation of the earth. This, however, is not mandatory but a good to have.
A large, fast memory card is also recommended as timelapses involve shooting potentially hundreds of Long Exposure photographs one-after-the-other for up to 6 hours straight or even longer as in this case! We cannot afford to have our memory Card get bogged down, as it will completely mess up the interval. I prefer the Prograde CFast™ 2.0 Cards. These are high performance cards with blazing read and write speeds verified to perform at a sustained read rate of up to 550MB/second and a sustained write speed of up to 450MB/second. And thankfully they have never failed me yet on any of my expeditions - be it wildlife or landscape or astrophotography. I also have a few spare Lexar and Sandisk cards of similar sizes and speeds as a fail-safe.
Pro Tip: Direction is not important for Star Trails photography because different trails are possible in different directions. There are two main types of star trails: Star Paths and Star Circles or Star Arcs. Photographing one or the other will depend on the direction in which you’re pointing your camera.
STAR CIRCLES
Depending on the hemisphere you are in, point the camera directly north or directly south at either of the celestial poles and you’ll see the stars moving in a circular motion - creating either circles or arcs. These are the so-called star circles, better known as Circumpolar Star Trails. They are the most typical star-trail photography subjects
STAR PATHS
On the other hand, when you shift your perspective and look towards the east, or west, you’ll start seeing straighter star paths instead of circles. Star paths can be easier to shoot because you don’t need to find Polaris or the south celestial pole. If you are located near the equator, star path photos are more common than taking star circles images.
Camera Settings
First and foremost - there are no “default“ settings when photographing Star Trails. But ideally before starting to photograph the star trails, one will need to decide the look of the final image - whether to have tons of stars in the image creating dense and bright star trails or to have fewer stars, more star colours and some spacing between them. Shooting at an ISO of 1600 or higher, as I have done here, will create fairly dense trails but they will not be as colourful or vibrant as shooting between ISO 400 and ISO 1000. I am headed out to the Singalila Ridge for a week next week and weather permitting I hope to shoot some low ISO vibrant star trails hopefully with an interesting foreground subject like the Kagnchendzonga range or some of the stunning monasteries that dot the landscape or even light paint a rhododendron tree. Now THAT is something to look forward to.
With that said, here are some preferred settings to get you started:
Always shoot in Manual
Focus on the stars Manually. Turn of Auto Focus. Turn of Lens Stabilization.
Preferred Aperture: f/2.8 or f/4
Preferred ISO: Between 400 and 1000 (the maximum ISO I have used is ISO 3200)
Shutter Speeds: Between 20 -30 seconds (I usually try and keep within the sharp stars limit so I can have both a timelapse and if a meteor goes through I can have a single photo with sharp stars and the meteor streaking through it. I used a 19 second shutter speed in this case.)
White Balance: Between 3000 - 5200Kelvin (Please DO NOT leave on Auto)
Long Exposure Noise Reduction - OFF
Many people recommend using ISO 1600+ when shooting at night. However, this has the potential to clip the highlights (stars in this case). Since our entire image is focused on the stars, this isn't a good idea! You might be surprised at the star colors you can capture when you use a lower ISO. If you use a substantially lower ISO, you could also take longer exposures. Instead of taking 20 - 30 second images, you could take 1 or even 2 minute exposures! These longer exposures would capture more light, resulting in a cleaner image, with less grain. It doesn't matter that the stars will show motion in each photo, we are creating a star trails image after all.
The best part of star trails photography is the amount of flexibility it provides. A number of different techniques can be used and each will always result in a great final image. A word of caution though - be aware of the interval between the individual photos. If the interval is not set properly it will lead to some serious issues while creating the timelapse. Always set the shooting interval to one second longer than the shutter speed.
However some camera brands are programmed differently, and they require a 1 Second interval. Therefore, if the shutter Speed was 20 seconds, the interval would simply be 1 second. If a 21 second interval is used in this case, it would result in a large gap between each photo. Therefore before heading out for the night, determine which way the camera works! The interval will either be 1 second longer than the shutter speed, or just 1 second. Try both options and see what happens. If the camera goes "click..click" it indicates that the exposure ended and another one began. If only one "click" is heard and then a long pause, the interval isn’t set properly.
Now all is set and the only thing needed is spending the hours needed to get the photos. The more the number of exposures, the longer the star trails will look. In this current scenario I took approximately 2300 photos over almost 12 hours.
If you don't want to spend all night for one star trails image, there's a much faster way - use a telephoto lens! As you zoom in on the stars, their apparent movement speeds up.
Post Production
I prefer a few programs to create my star trails one of them being StarStaX. It is a free program that is easy to use and seamlessly creates a Star Trails photo. This application takes all the photos and blends them together providing multiple options to choose from and a variety of methods including Gap-Filling and Comet Trails which are my favourites. StarStaX also allows the use of Dark Frames - which helps to eliminate hot pixels - provided I remembered to take one after shooting all of exposures. Another feature I like is the function to Cumulative Blend. This allows each photo to be processed and then save the composite image as a part of a sequence. Later when all these sequential photos are imported into a program like After Effects or Premiere Pro it is possible to create a beautiful Star Trails video. The video you see here is an example of this process.
Other programs like Sequator for Windows and Photoshop can also be used. I find that Photoshop creates the highest quality Star Trails however, this is by far the hardest and most time-consuming option. I would recommend sticking with StarStaX.
In conclusion, Star trails photography is fascinating, and it should be attempted by everyone at some point. Unlike Milky Way photography, Star Trails can be don’t at any time of the year. It is a kind of photography that requires some patience given that the shooting process takes a few hours but the results are worth it.


Related Posts