
The Beauty of Infrared Photography
The part of the spectrum referred to as near-infrared.
Paris & Singapore

Moulin Rouge, Paris | EOS Kiss Digital Rebel X+EF-S 18-55mm f/3.5-5.6 IS STM at 31mm | f/5.6 | 1/200 seconds | ISO 200
Date of photo: 03 August 2008 around 8:34pm | IR rendered in 2008, in post
One of the most charming contrasting color effects you can get in photography is by using infrared. An easy way to understand near-infrared light is to think of it as the color of the rainbow next to red, a color that is invisible to the human eye. Infrared photography has a strong appeal for fine art photography. It looks very surreal and otherworldly, with trees taking on a bright white or yellow hue, and skies a red or blue hue. Leaves appear frozen over and skies take on dramatic colors in both black and white and color photography. But near-infrared is not the same as thermal imaging which is far-infrared. What I have done here in my photographs is leverage the near-infrared spectrum and tried to provide a look into an invisible world present in the visible around us.
Because everyday objects reflect infrared in proportions that differ sharply from that of visible light, the tonal relationships are wildly unexpected. Such near-infrared techniques used in photography give subjects an exotic, antique look. Green vegetation becomes white, whereas human skin looks much softer with most blemishes disappearing and the skin becoming pale and ghostly. The resulting images look alien.
The human eye can see wavelengths from about 400nm-700nm (from purple to red); infrared is the light beyond 700nm. Infrared photography can be done with either infrared film, or a digital camera, and typically involves near infrared light in the 700nm to 1200nm range. This is different than thermal infrared, which images far into the infrared spectrum.
The three general ways to do IR photography.
Infrared film: This was the first method developed and for a long time this was the only way to shoot infrared. This required specialized film, the use of an infrared filter over the lens, and specialized developing. This can still be done today, but the film is hard to find. Pros: Nostalgia, and learning to overcome challenges. Cons: Hard to find the film, hard to keep the film from fogging, exposure and focus bracketing required.
Digital camera with an infrared lens filter: This is possible because modern digital sensors are (luckily!) sensitive to wavelengths between 300 and 1200nm. To preserve the color fidelity for normal photography, manufacturers have integrated “IR Cut filters” over the sensors to block UV and IR. These filters are not perfect, so by placing a 690 or 720 IR filter on the lens and taking a long exposure, you can take infrared photos on some cameras. Pros: The cheapest way to try infrared. Cons: Long exposures require a tripod, motion blur, exposure and focus bracketing, limited filter options.
Infrared converted camera: By removing the IR cut filter that is over the sensor and replacing it with an IR pass filter, the camera becomes fully sensitive to infrared. This infrared conversion removes the need for long exposures and lens filters. Pros: Normal exposure times, using the camera like normal, more filter options, sharper results. Cons: Pricier than a filter and in most cases a permanent fix. But in today’s world manufacturers are providing such cameras which can still be used for daytime photography with special multi-coated clear filters. Best known examples of such ‘modified‘ cameras are seen in astrophotography and usually used with narrowband filters to capture distant galaxies emitting specific ionised gases in these bands. The recently released Canon EOS Ra and the earlier 60Da are very popular astro modified cameras.
Besides the appeal of fine art and astrophotography, infrared and full spectrum photography are used in other fields. Many materials and dyes do not look the same in visible light and infrared light. This can be used to spot camouflage, spot counterfeit money, and see through spills for document recovery. Full spectrum photography is also popular in the field of deep space astrophotography for taking pictures of the stars as some stars are only visible when viewed in the IR or UV spectrum. I hope to share some photos taken in narrowband and broadband passes fairly soon.
There are also countless other applications for full spectrum photography including agricultural or ecological plant analysis, medical applications, forensics, greater light sensitivity for low light shooting, game hunting, as well as many others.
The Electromagnetic & Visible Light Spectrum, wavelengths and frequencies.
Infrared photography produces some very distinct effects which make them aesthetically pleasing. The most striking difference is the “Wood Effect”, an effect where leaves reflect light giving them a bright white look. This effect is named after the photographer Robert W. Wood, who is considered the father of infrared photography. This effect is utilized for landscape photography where it can be used to produce surreal color landscapes or high contrast Black & White photographs.
Virtually all conventional digital cameras are manufactured today with “hot mirror” infrared cut-off filters specifically designed to block infrared light from reaching the sensor. Film is usually sensitive to visible light too, so an infrared-passing filter is used; this lets infrared (IR) light pass through to the camera, but blocks all or most of the visible light spectrum (the filter thus looks black or deep red as in mine). "Infrared filter" may refer either to this type of filter or to one that blocks infrared but passes other wavelengths. I have used the Singh-Ray 100x100mm I-Ray 690 Infrared Filter to create some of these images. With the 690 I-Ray filter, the initial goal was to come as close as possible to reproducing the “faux color” of a 590 converted camera, while dramatically reducing exposure times. At a filter strength of 690nm, it emitted sufficient infrared light, enabling the creation of pleasing infrared images in both color and black & white — and dramatically cut exposure times depending on ISO, from less than one second to 2-3 seconds.
When these filters are used together with infrared-sensitive film or sensors, "in-camera effects" can be obtained; false-color or black-and-white images with a dreamlike or sometimes lurid appearance known as the "Wood Effect," an effect mainly caused by foliage (such as tree leaves and grass) strongly reflecting in the same way visible light is reflected from snow. There is a small contribution from chlorophyll fluorescence, but this is marginal and is not the real cause of the brightness seen in these infrared photographs. The effect is named after the infrared photography pioneer Robert W. Wood, and not after the material wood, which does not strongly reflect infrared.

Rue Andrė Antoine, near the Sacré-Cœur, Paris | EOS Kiss Digital Rebel X+EF-S 18-55mm f/3.5-5.6 IS STM at 25mm | f/5.6 | 1/200 seconds | ISO 400
Date of photo: 03 August 2008 around 8pm | IR rendered in 2008, in post
Most manual focus 35mm SLR and medium format SLR lenses have a red dot, line or diamond, often with a red "R" called the infrared index mark, that can be used to achieve proper infrared focus; many autofocus lenses no longer have this mark. When a DSLR camera is fitted with a filter that is opaque to visible light, the reflex system becomes useless for both framing and focusing, one must compose the picture without the filter and then attach the filter. This requires the use of a tripod to prevent the composition from changing. A sharp infrared photograph can be done with a tripod, a narrow aperture and a slow shutter speed without focus compensation, however wider apertures like f/2.0 can produce sharp photos only if the lens is meticulously refocused to the infrared index mark, and only if this index mark is the correct one for the filter and film in use. Diffraction effects inside a camera are greater at infrared wavelengths so stopping down the lens too far may actually reduce sharpness.
We know that zoom lenses scatter more light through their more complicated optical systems than prime lenses, that is, lenses of fixed focal length; for example, an infrared photo taken with a 50mm prime lens may look more contrasty than the same image taken at 50mm with a 24-70mm zoom. The more the number of elements the more complicated it gets and the higher the scattering. This is one of the reasons why people prefer to shoot with Primes rather than Zooms albeit they may not always know the reasons.
The other attributes of infrared photographs include very dark skies and penetration of atmospheric haze, caused by reduced Rayleigh scattering and Mie scattering, respectively, compared to visible light. The dark skies, in turn, result in less infrared light in shadows and dark reflections of those skies from water, and clouds will stand out strongly. These wavelengths also penetrate a few millimeters into skin and give a milky look to portraits, although eyes often look black.
On a tangential note, I hope to be able to create more false-color images of the Milky Way and the night skies around us leveraging only specific bands of the spectrum. This is an effort to, hopefully, eliminate the light pollution I have faced from urban settings when I try to photograph the skies and the unfathomable beauty they present.
An additional point to note on IR Photos - the RAW Infrared photos from the camera will have a strong red tint created by the filter used and to remove this tint a certain degree of processing is required. The White Balance and color correction will need to be done in post-processing and any tool like LightRoom, Camera Raw or Photoshop can be used. I personally use LightRoom and Camera Raw but more often than not I will try and get the image I want in camera. I have custom White Balance profiles I have created and stored for use with IR Photography and other genres and when I shoot I switch to the profile I need. This has saved me an immense amount of time and heartache in post processing. And while I am on post processing…

‡‡‡‡‡
The following photos are all in-camera IR photos created with the help of numerous filters. The most used was a combination of the Singh-Ray I-Ray 690, Breakthrough Photography ND 3 and ND 6 & the Blackstone CPL to cut through the reflections and glare. Find them all in my bag.
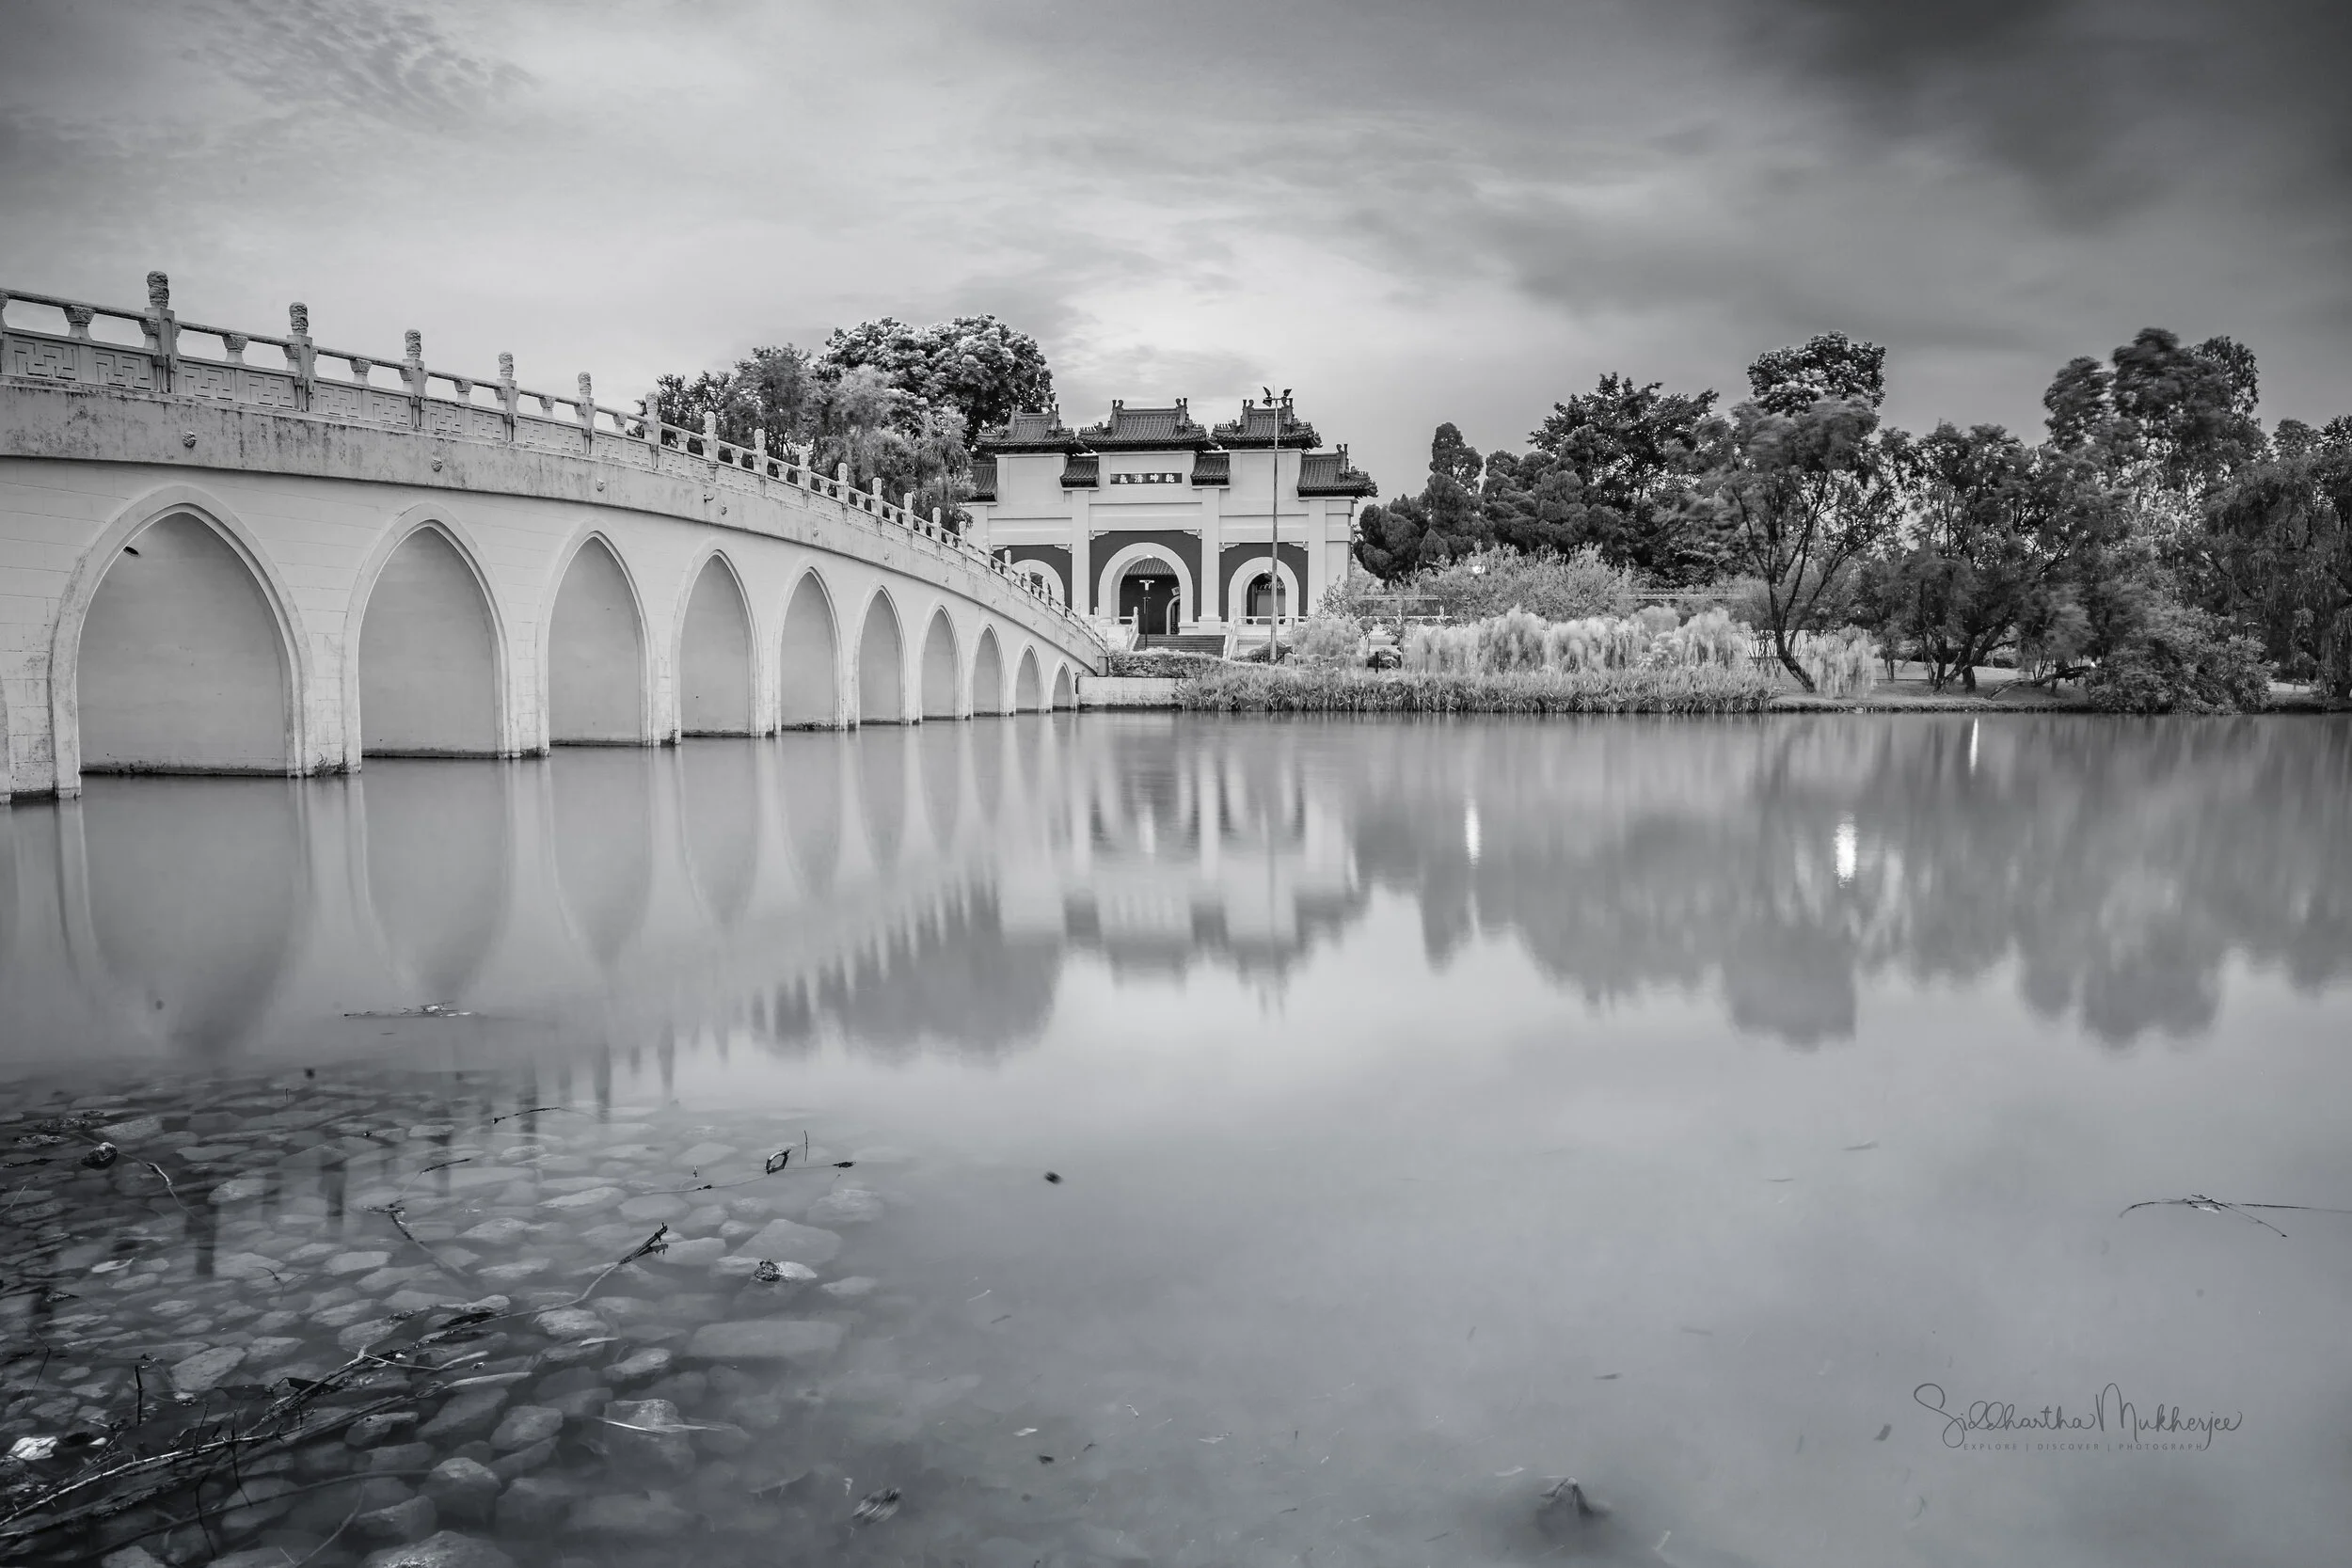
The White Rainbow Bridge, Chinese Garden, Singapore
The Chinese Garden is a park in Jurong East, Singapore. Built in 1975 by the JTC Corporation and designed by Prof. Yuen-chen Yu, an architect from Taiwan, the Chinese Garden’s concept is based on Chinese gardening art. The main characteristic is the integration of architectural features with the natural environment. The Chinese Garden is modeled along the northern Chinese imperial style of architecture and landscaping. It is located next to Chinese Garden MRT Station and connected to the adjacent Japanese Garden by a bridge. Along with Japanese Garden, the two gardens are collectively known as the Jurong Gardens. In the art of Chinese gardens, bridges play a critical role and the most important structures may denote the character. The Bái hóngqiáo (Chinese: 白虹桥, "The White Rainbow Bridge") at the Garden follows the style of the Seventeen-Arch Bridge at the Summer Palace in Peking.
Also pictured here is the Main Arch Building, a renowned and typical Chinese arch building. The magnificent and grandiose form has made it very popular for picture-taking. Inside the main arch building, there are two courtyards, namely the “Early Spring Courtyard” and “Garden Courtyard”. Also, there is a fishpond in the centre which is named the “Fishes Paradise”.

White Rainbow Bridge, Chinese Garden, Singapore | 1DxM2+16-35mm f/4 at 22mm | f/11 | 15 seconds | ISO 100 | Singh-Ray I-Ray 690 | Custom White Balance corrected to remove the red tint of the IR FIlter
Date of photo: 17 May 2019 around 7pm
White Rainbow Bridge, Chinese Garden, Singapore | 1DxM2+16-35mm f/4 at 24mm | f/11 | 17 seconds | ISO 100 | Singh-Ray I-Ray 690 | Custom White Balance corrected to remove the red tint of the IR FIlter
Date of photo: 17 May 2019 around 7.30pm
Twin Pagodas, Chinese Garden
Along with the Japanese Garden, the two gardens are collectively known as the Jurong Gardens. In ancient times, the pagoda, originally a simple tower located beside a temple, was used for the keeping of human bones by Buddhists. Later, with improvements in architectural skills, incorporated with the traditional art of building, the pagoda was developed into a structure of striking architectural beauty.
Once inside Chinese Garden from the West (Main Entrance), walk along the pathway on the left and you will be able to see a pair of pagodas standing on an extended walkway over Jurong Lake. They are called the Twin Pagodas. The three-storey twin pagodas are named the Cloud Wrapped Pavilion (披云阁) and Moon Receiving Tower (延月楼). The pagodas have red doors and spiral staircases leading to the top of the pagodas. Once at the top, one can see the Jurong Lake overlooking the White Rainbow Bridge at the West Entrance.
Also near the West Entrance one can see the Ru Yun T’a (7-storey pagoda) situated on a small hill. Its typical pagoda design follows the style of Linggu Temple Pagoda at Nanjing.

Twin Pagodas, Chinese Garden, Singapore | 1DxM2+16-35mm f/4 at 28mm | f/11 | 5 seconds | ISO 100 | Singh-Ray I-Ray 690 | Custom White Balance corrected to remove the red tint of the IR FIlter
Date of photo: 17 May 2019 around 6.30pm

Twin Pagodas, Chinese Garden, Singapore | 1DxM2+16-35mm f/4 at 25mm | f/11 | 2.9 seconds | ISO 100 | Singh-Ray I-Ray 690 | Custom White Balance corrected to remove the red tint of the IR FIlter
Date of photo: 17 May 2019 around 6.30pm
The following photo of the Twin Pagodas is without the IR filter and using, if I recall correctly, a 6 stop ND Filter. I have included this photo to illustrate the actual dynamic range of the location and also the various colors that make up the scene. The use of various filters allows for rendering multiple versions of the same scene and each photo has its own unique appeal. Find the filters I use in my bag.
Some noise here, intentionally retained, because I used the Blackstone ND versus my usual Breakthrough Photography ND filters. Interesting how the noise profiles, color shifts vary depending on the materials used, glass in both the cases here. The Blackstones seem to generate more noise compared to the Breakthroughs. Color shifts are negligible but there also appear to be some artifacts with the Blackstones when the light is really low but these can easily be corrected in post processing. This photo was taken at 8pm.

Twin Pagodas, Chinese Garden, Singapore | 1DxM2+16-35mm f/4 at 35mm | f/16 | 209 seconds | ISO 100 | WCC Blackstone 6 Stop ND filter
Date of photo: 17 May 2019 around 8pm
In conclusion, scientists have discovered that infrared light can penetrate cells and tissues in the body by an inch and a half and heat them up. This has spurred the rise of infrared saunas, which have gained popularity in recent years especially mid-infrared light, which has longer wavelengths and is the kind of light used in infrared saunas. This is in contrast to near-infrared light, which has shorter wavelengths and is used in infrared helmets — literally a helmet or headset with small infrared lights glued to the inside.
The benefits of near-infrared light aren’t from the heat it provides but how it alters the body’s cells. It is astonishing the number of diseases and conditions that can be treated using near-infrared light — injuries, arthritis, tendonitis, muscle pain. It can also be used on the head for the brain — for dementia, psychiatric disorders, head injuries. Scientific studies are still on in this field to prove conclusively the therapeutic applications of near- and mid-infrared light.
So not only is Infrared Light aesthetically pleasing in photography it also has many medical applications. There may be a biological rationale, but clinical studies to prove that near-infrared light therapy works in humans are still needed. So for now, hold off on buying an infrared helmet. In the meantime, if you’re desperately looking for a health hack that will boost your mood, improve your skin, enhance your cognition, and help you lose weight and live longer, try going for a run or get a camera and head out into the wild. In case of deterrents like lockdowns and quarantines the wilderness of the garden or the dangers of living on the edge of the rooftop will suffice.


Related Posts


